Water stains on the ceiling have a knack for showing up long before the budget to fix them does. Standing in the garden, looking up at a few loose slates or a sagging gutter, the immediate worry isn’t just about the leak itself. It’s about the cost. It’s no wonder most Dublin homeowners hesitate to call a roofer; they’re dreading the unknown price tag that comes with the work. But you can remove that uncertainty right now. You don’t need to wait for a contractor to walk up your path to get a real handle on the scale of your project.
Measuring your own roof puts the power back in your hands. It transforms that vague, nagging anxiety into a concrete set of numbers. With accurate dimensions, you can start checking material prices, estimating labour costs, and you’ll be able to spot a padded quote from a mile away. The best part? You can do most of this work without ever leaving the ground. This guide will walk you through the geometry of Dublin roofing in simple, manageable steps, ensuring you get all the materials you need without paying for a single tile you don’t.
Key Takeaways
- Cost Insight: Getting a new roof in Dublin typically ranges from €3,000 for a small terraced house to over €15,000 for a large detached home with a metal roof.
- Safety First: Forget climbing ladders in the wet. Modern laser tools let you measure your roof with incredible accuracy, all while you’re standing safely on the ground.
- Calculation Logic: Remember, a sloped roof’s surface area is always bigger than the floor area it covers. You have to apply what’s called a ‘pitch multiplier’ to get the true figure.
- Material Wastage: Always add an extra 5-10% to your final material total. This covers all the necessary cuts, accidental breakages, and overlaps.
- Professional Verification: While your own estimate is fantastic for budgeting, getting a professional survey from Emergency Roofers Dublin ensures pinpoint precision before you order a single thing.
Get an Instant Dublin Roof Cost Estimate Without a Ladder
Let’s be honest, the first question on your mind is about money. Before you start worrying about tape measures or pitch angles, you need to know if the project even fits into your financial reality. Here in Dublin, the price of a new roof can vary wildly based on its size and the materials you choose. Looking at data from local surveyors, homeowners should budget somewhere between €3,000 and €15,000 for a complete replacement. That’s a huge range, but it starts to make a lot more sense when you look at the specific types of houses common to our city.
For a standard 30m² roof on a terraced house using concrete tiles, you’re typically looking at a cost between €3,000 and €3,900. If you live in a 60m² semi-detached home and you love the classic look of natural slate, the price naturally jumps up to a range of €7,200 to €10,800. For larger properties, like those with a 100m² pitched roof using modern metal sheeting, costs often land somewhere between €11,000 and €15,000. These figures, backed up by pricing guides from Dhennessy Roofing and Roof Cost Calculator, give you a solid baseline to start from.
Labour is what drives a significant chunk of this cost. Skilled Dublin roofers typically charge between €50 and €70 per hour, a rate that reflects the high demand and necessary insurance costs in the capital. You also need to think about the elements that aren’t just tiles or slate. Things like new insulation, installing a Velux window, or repairing a chimney all add to the final bill. That’s why when you contact us at Emergency Roofers Dublin, we make sure to factor these elements in from the very beginning, so the final quote truly matches your initial expectations.
The Safest Way to Measure Your Roof
Ladders and Dublin drizzle are a hospital visit waiting to happen. Our famously wet climate makes roof surfaces slick and genuinely treacherous. The good news is, you don’t need to climb up there to get a measurement that’s more than accurate enough for a quote. Thankfully, modern technology has made the clunky old tape measure obsolete for these initial surveys. Laser distance measurers allow you to capture every dimension from the safety of your driveway with millimetre precision.
Using a laser device not only reduces risk, but it also saves a huge amount of time. A simple digital tool can capture the dimensions of a 100m² roof in half the time it takes to drag a tape measure around the perimeter. Suppliers like RoofnStop stock laser measurers that are perfect for this job. The Condtrol 30m Compact costs around €50 and fits right in your pocket. For bigger homes, the Condtrol XP3 Green offers better visibility in daylight and costs approximately €150. These tools give you an incredible ±1.5mm accuracy over 30 metres, completely eliminating the sagging tape errors that can throw off manual calculations.
If you’re dealing with dampness alongside your measurement project, tools like the Hydro Tech 1 Sensor Digital Moisture Meter or a DEC Scanner can help you pinpoint where water is getting in without having to rip up any tiles. HiTechniques is a great local supplier for these non-destructive testing tools. And for checking your roof’s pitch? You likely already have the tool you need. A standard smartphone with a free inclinometer app can tell you the slope angle just by aligning your phone with the roofline from the ground.
A Step-by-Step Guide to Calculating Your Roof’s Area
Figuring out the area of your roof isn’t as simple as measuring your floor and ordering that amount of tile. The slope of the roof means its actual surface area is always greater than the ground it covers. The best way to start is by sketching the basic shape of your roof on a piece of paper. Don’t worry about making it perfectly to scale; just get the general shape down.
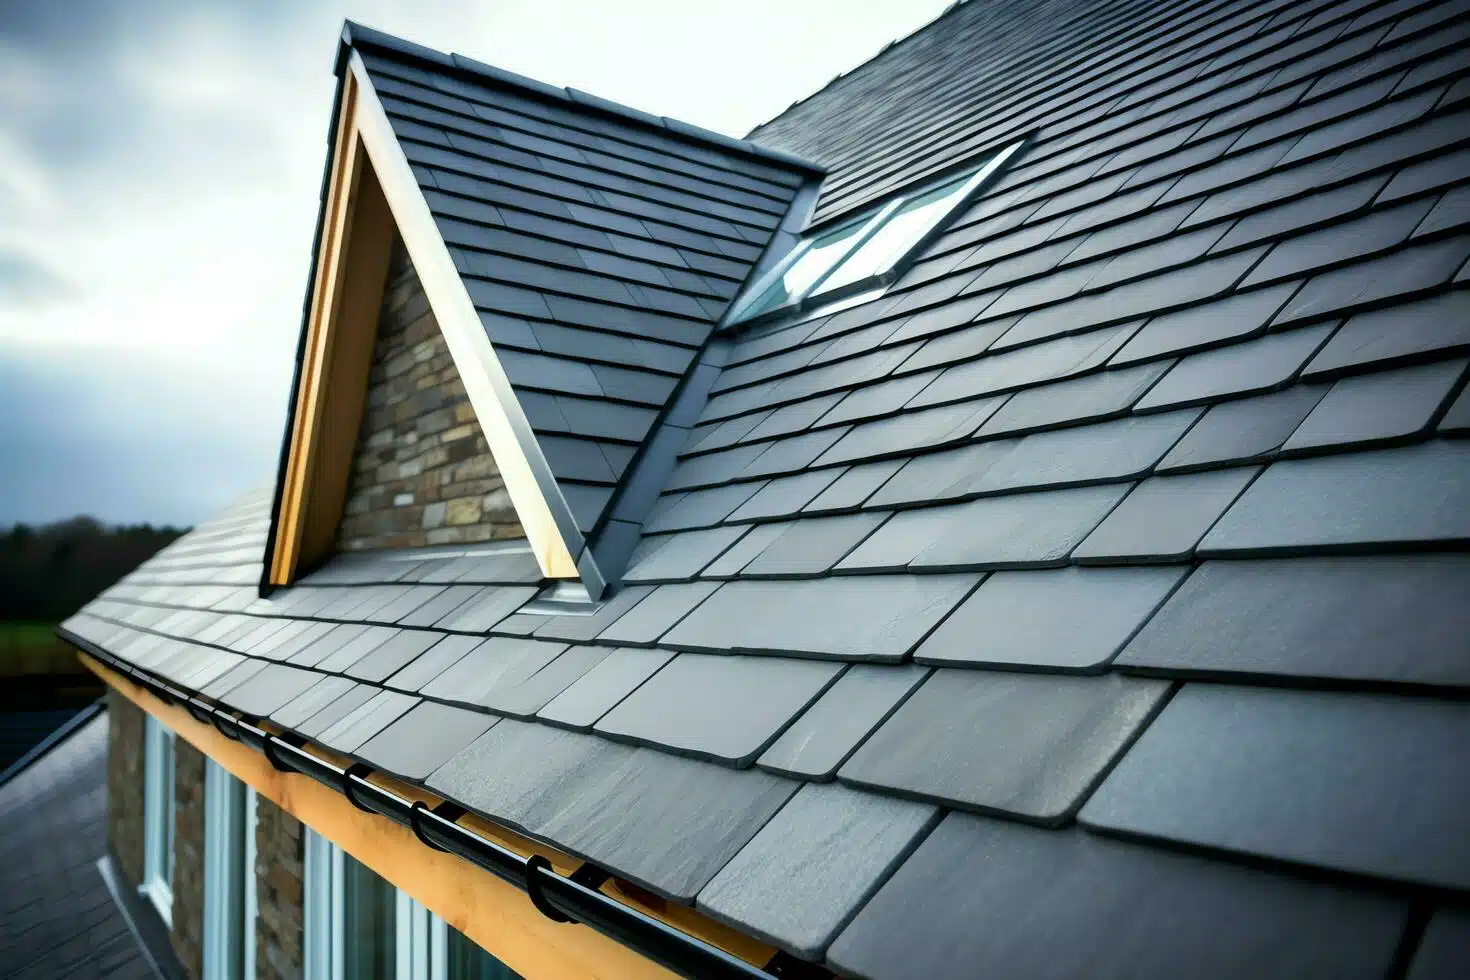
Measuring Simple Gable Roofs
The gable roof, that classic inverted ‘V’ shape, is the most common style you’ll see in Dublin. It’s basically two big rectangles that meet at a peak. To measure this, stand at the gable end of your house (the triangular wall). First, measure the length of the house from one end to the other. Then, measure the width of the house at the gable end.
Usually, you’d calculate the area of one rectangular slope and simply multiply it by two. However, measuring the length of that slope from the ground is tricky. A better way is to measure the horizontal span (the width of the house from wall to wall) and use the pitch calculation we’ll cover below to find the true length of the slope. If you can safely measure the slope directly from the edge of the eaves up to the ridge, then just multiply that length by the width of the roof. Do this for both sides and add them together.
Calculating the True Area of a Pitched Roof
To get the true area without climbing, you need to apply a ‘pitch multiplier’ to the flat footprint of your roof. A flat, horizontal measurement doesn’t account for the incline. The steeper your roof, the more tiles you’re going to need.
First, you have to determine the slope. If your roof rises 4 inches for every 12 inches it runs horizontally (this is called a 4/12 pitch), the multiplier is 1.054. If you have a much steeper 8/12 pitch, the multiplier is 1.202. You take the flat area you measured (Length × Width) and multiply it by this number. It’s easy to see how a house with a 100m² footprint and a steep pitch needs significantly more material than the same house with a shallow roof.
Don’t Forget the Wastage Factor
Your maths might be perfect, but the real world involves broken tiles, awkward cuts, and overlapping pieces. You absolutely must order more material than your exact square metreage dictates.
- Standard Buffer: For a simple gable roof, adding an extra 5-10% to your total is a safe bet. This covers the basic cuts you’ll make near the edges.
- Complex Allowances: For more complicated roofs with hips and valleys, you should increase this buffer to 10-15%.
- Tile Specifics: Funnily enough, small tiles often result in less waste than large metal sheets, where a single bad cut can ruin a whole, expensive panel.
How to Handle Complex Dublin Roofs
Of course, very few roofs in Dublin are simple rectangles. Our terraced rows and semi-detached homes are often full of returns, bay windows, and extensions. These features create hips (the external angles where roof planes meet) and valleys (the internal angles), which can complicate your measurements. A typical Dublin semi-detached roof covers between 30 and 60m², but the geometry can be surprisingly tricky.
Measuring Hipped Roofs and Irregular Shapes
A hipped roof is one that slopes down on all four sides. You can’t just treat this as two simple rectangles. The trick is to break the shape down into simple shapes you remember from school: triangles and trapezoids. Measure the base and height of each triangular section you see. Then, calculate the area for each individual shape and add them all up at the end.
As roofing experts at Hproofing note, these complex designs require very careful estimation. Hipped roofs generate more waste because you have to cut tiles at an angle to fit neatly along the hips. While a straightforward gable roof might only need 5% extra for waste, a hipped roof often demands a full 15% extra material just to cover all the off-cuts from those diagonal ridges.
Accounting for Overhangs, Eaves, Chimneys, and Vents
Here’s a classic mistake people make: they measure from wall-to-wall and completely forget that the roof extends past the brickwork. These eaves and overhangs are there for a reason, to they protect your walls from rain. In Dublin, these overhangs can easily add another 10-20% to your total roof area. You must measure the horizontal distance the roof projects out from the wall and add that to your dimensions.
Obstacles like chimneys, skylights, and vents present a different kind of challenge. You might think you should subtract their area from your tile order. Don’t do it. You still need to buy flashing kits and spend time cutting tiles to fit perfectly around them. The space you save from the chimney’s footprint is almost always cancelled out by the breakage and cutting required to fit the surrounding tiles snugly against it. It’s much safer to keep your total area calculation whole.
Specific Measurement Rules for Flat and Green Roofs in Dublin
Flat roofs are a standard feature on extensions and garages all across the city. But despite the name, a flat roof must never be truly flat. Dublin City Council regulations and simple good building practices demand a slight slope to prevent water from pooling. Standing water always finds a way to become a leak, eventually.
You must measure for a fall. The minimum recommended fall is typically 1-in-80, though a design fall of 1-in-40 is much better to account for any small construction inaccuracies. When you measure a flat roof area, you’re measuring the waterproofing surface, which should also run up the adjoining wall (this is called an ‘upstand’) by at least 150mm. You have to add this perimeter measurement to your total area.
Green and Blue roofs have become more popular for their sustainable approach to drainage, and the Dublin City Development Plan (SI23) sets out strict rules for them. If your roof is over 100m², you may even be required to install a green roof system to help manage rainfall. This affects your measurements because you aren’t just measuring for a membrane; you’re calculating the volume needed for drainage layers, soil, and sedum mats. Drainage outlets have to be positioned at the lowest points, and for blue roofs, you need to calculate for water attenuation (storage) capacity, often designed to handle a once-in-30-year storm event.
Translating Measurements into Material Orders
A number on a page isn’t a roof. You have to convert your square metres into pallets of slate, rolls of felt, or sheets of metal. This translation step is exactly where expensive errors tend to happen. Using digital calculators for this can reduce ordering mistakes significantly, sometimes by as much as 20%.
Calculating for Slate, Tiles, and Metal Sheets
Different materials have different rules of coverage. For metal roofing, you can’t just use the physical width of the sheet. You have to use the effective width provided by the manufacturer, which accounts for the overlap required to keep the rain out. As H Proofing highlights, the formula for sheets is the Total Roof Area divided by the Coverage Area of a Single Sheet. And always round up to the nearest whole sheet.
For tiles and slates, the headlap is critical. This is simply the amount one tile overlaps the one below it. A larger headlap reduces the visible surface area of each tile, which means you’ll need more tiles per square metre. Manufacturers always provide a table showing how many tiles are needed per m² at different gauges.
Estimating for Flashing, Drip Edges, and Nails
The roof covering is only one part of the whole system. You have to measure the perimeter for drip edges, which guide water neatly into the gutter. If you miss this part, you’re inviting rot into your fascia boards. You also need to measure the linear metres of all your ridges and valleys to get the right amount of flashing.
Nails and fixings are very often underestimated. Weather Pro Roofing suggests you always check the manufacturer’s specifications for how many fixings are needed per square metre. In Dublin’s windy climate, skimping on nails is just plain dangerous. High-quality materials like natural slate or concrete tiles are an investment, costing up to €10,800 for a standard semi-detached home, but their ability to resist the Irish weather makes them worth it compared to cheaper alternatives.
Why a Professional Measurement from Emergency Roofers Dublin Saves You Money
You might be thinking that doing all this yourself saves cash. In the early stages, it absolutely does. It helps you understand the scope of the project. But when it comes time to order €10,000 worth of materials, a DIY measurement becomes a big risk. A simple miscalculation of the pitch or forgetting an overhang can leave you short of tiles right in the middle of a job, or worse, with pallets of unreturnable slate sitting in your driveway.
This is where Emergency Roofers Dublin bridges the gap. We provide comprehensive surveys that use the exact same tools and logic you’ve just learned about, but they’re backed by years of on-site experience. We don’t just measure for tiles. We inspect the integrity of your integrated guttering and chimney systems. We can identify if your current rafters can even support the weight of a heavy new slate roof.
We understand Dublin architecture. We know the quirky returns on old Victorian terraces and the specific drainage requirements for modern extensions. A professional survey prevents those hidden costs that so often plague construction projects. Get in touch with Emergency Roofers Dublin today. We’ll give you a precise, no-obligation measurement and a quote that covers every single nail, slate, and flashing strip, ensuring your budget stays safe and your roof stays perfectly dry.
Measuring your roof is the first real step toward a secure, dry home. It takes the fear out of the unknown and gives you the data you need to make smart financial decisions. Whether you’re budgeting for a simple repair or a full-scale replacement, knowing your numbers protects you from bad quotes and wasted materials. Use the tools available, follow the formulas, and when you’re ready to move from an estimate to action, call in the experts to finalize the plan. Your home deserves that level of care and attention.
Frequently Asked Questions
The cost to re-roof a house in Dublin depends on the size and material, but it generally falls into a few distinct bands. For a standard 3-bed semi-detached house, you can expect to pay between €7,000 and €11,000 for a full replacement. Smaller terraced houses might be around the €3,000–€4,000 mark, while large detached homes with premium materials like natural slate can easily go over €15,000.
The difference in price is mostly down to labour rates (about €50–€70/hr in Dublin) and your choice of material. Concrete tiles are the most budget-friendly, while natural slate and zinc are premium, longer-lasting options. If access to your roof is difficult, for example, needing complex scaffolding on a narrow Dublin street, that can also increase the final price.
Always try to get at least three quotes. Make sure any quote you get includes waste removal and scaffolding, as these are often sprung on people as hidden extras later.
Yes, you can absolutely measure your own roof to get a preliminary estimate, but you shouldn't use those numbers for the final material order. Using tools like laser measurers from the ground allows you to calculate a reasonably accurate area estimate (usually within 10-15%) without ever setting foot on a ladder.
Your measurements might miss critical details like the exact pitch multiplier, the full overhang of the eaves, or the specific effective width of certain materials. A 5% error on a 100m² roof can result in a material shortage that brings the whole job to a halt.
Use your own measurement to set a realistic budget and to check the quotes you get from contractors. If a roofer quotes you for 150m² on a roof you measured at 100m², you know you need to ask some pointed questions.
Calculating the area from the ground involves measuring the building's footprint and then applying a pitch multiplier to account for the slope.
Measure the length and width of your house at ground level. Multiply them together to get the flat area. Next, figure out your roof's pitch (its slope) and multiply the flat area by the correct pitch multiplier (for instance, a 30-degree slope has a multiplier of about 1.15).
Think of it this way: a sloped roof covers more surface area than the flat floor directly beneath it. If you ignore the pitch, you'll seriously underestimate how much material you need.
Before you do the multiplication, remember to add the length of the overhangs (eaves) to your initial length and width measurements.
A pitch multiplier is simply a number that converts a flat, horizontal measurement into an accurate, sloped roof measurement. It represents how much longer the sloped surface is compared to the flat ground it covers. For example, a standard 4/12 pitch (an 18.4-degree angle) has a multiplier of 1.054. A much steeper 12/12 pitch (a 45-degree angle) has a multiplier of 1.414.
If your house's footprint is 100m² and you have a 45-degree roof, you would calculate 100 × 1.414 = 141.4m². This tells you that you need nearly 42% more material than the floor plan might suggest.
The steeper the roof, the higher your material and labour costs will be. High-pitch roofs are also more difficult and dangerous to work on, which will also be reflected in the quote you receive.
You must always include a wastage factor in your order to account for all the necessary cutting, accidental breakage, and material overlaps. For simple gable roofs, an extra 5-10% is a safe bet. For more complex roofs with lots of hips and valleys, you should increase that to 15-20%.
Some materials create more waste than others. Large metal sheets, for example, have higher wastage on complex roofs because cutting a sheet to fit a valley often makes the leftover piece unusable. With small tiles, you can often use the off-cuts more efficiently.
It is always cheaper to order 10% extra from the start than it is to pay for a second delivery fee and halt work while your team waits for a single bundle of tiles to finish the job.
The most accurate method is a physical survey combined with digital tools, but for a DIY approach, laser tools are by far the best option. Using a Laser Distance Measurer (like the Condtrol XP3) from the ground will give you millimetre-perfect linear measurements. When you combine these accurate linear measurements with a digital inclinometer app on your phone (to get the exact pitch), you eliminate the guesswork and errors common with manual tape measures.
While professionals might use drone photogrammetry for huge commercial jobs, for most Dublin homes, a careful laser measurement verified by a quick ladder inspection of the eaves is the gold standard
You need to break complex roofs down into smaller, manageable geometric shapes instead of trying to measure them as one big block.
Imagine your roof as a collection of triangles (for the hips) and rectangles or trapezoids. Measure the base and height of every single slope and shape individually. Remember that hips and valleys need special tiles and flashing. You have to measure the linear length of these features separately from the general area so you can order the correct ridge caps and valley troughs.
Add the area of all the individual shapes together. Be aware that hip tiles overlap, so you'll need the linear meterage of the hip ridges to order the cap tiles, in addition to the tiles for the main surface.
Dublin's regulations are all about preventing water from stagnating on roofs and managing heavy storm runoff. Flat roofs are not permitted to be perfectly flat. They must have a minimum finished fall of 1:80, though a 1:40 slope is the design standard to guarantee water flows correctly to the outlets.
For new builds and significant extensions, the Dublin City Development Plan encourages the use of Green or Blue roofs. These systems are designed to hold rainwater and release it slowly (a process called attenuation), which reduces the strain on the city's drainage system during heavy storms.
Failing to provide adequate falls or drainage outlets can lead to failed building inspections and could cause serious water damage down the line.
A slate roof is a premium choice, and its cost reflects its quality and longevity compared to standard concrete tiling. For a typical 60m² semi-detached house in Dublin, you can expect a natural slate roof to cost between €7,200 and €10,800.
The price can vary depending on where the slate comes from (Spanish, Brazilian, or Welsh). Welsh slate is the most expensive but also the most durable. You can also get fibre cement (artificial) slate, which is cheaper but has a shorter lifespan.
While it's a bigger initial investment, a natural slate roof can last for over 100 years. It adds significant resale value to a Dublin property in a way that standard concrete tiles do not.
Yes, absolutely. Forgetting to include the overhangs is one of the most common reasons people run short of materials.
Your roof extends beyond the exterior walls to guide water away from the house's foundation. This overhang is usually between 30-60cm wide. On a house with a 10m perimeter, a 50cm overhang adds a significant amount of square footage. If you exclude it, you won't have enough tiles for the very bottom row (the eaves course), which is critical for proper gutter drainage.
Always measure from the fascia board (the outer edge of the roof) up to the ridge, not just from the wall to the ridge.
You figure out the tile count by dividing your total roof area by the coverage capacity of the specific tile you've chosen.
Tiles overlap to keep water out. Because of this, you can't use the physical size of one tile for your calculation. You must use the covering capacity (which is listed as tiles per m²) provided by the manufacturer, as this figure changes based on the amount of overlap (headlap) you set.
The formula is: (Total Roof Area + Wastage) × Manufacturer’s Tiles per m² = Total Number of Tiles Needed.
Always round your final number up to the nearest full pallet or bundle size. Suppliers very rarely sell loose tiles for large jobs.
Yes, smartphone apps are surprisingly accurate and very useful for determining your roof's pitch. These apps use your phone's built-in gyroscope and accelerometer. By placing your phone flat against the rafters in the attic, or by carefully aligning your phone's camera with the gable end from the street, you can get a very accurate reading of the angle in degrees. Getting this angle right is essential for selecting the correct pitch multiplier, which is the key to an accurate area calculation.
For the best results, make sure you calibrate the app on a perfectly flat surface first. For your own safety, it's always better to measure from the attic or the ground rather than climbing onto the roof to place the phone on the tiles.
Measuring it yourself is cheaper upfront, but a professional survey often saves you a lot of money on the final project. A DIY measurement is free (apart from the cost of a laser tool if you buy one). A standalone professional survey might have a fee, although many roofers, including us, offer it for free as part of a quote.
A professional will spot underlying issues a DIYer would almost certainly miss, like rotting battens or inadequate ventilation. Catching these problems early prevents expensive change orders halfway through the project.
Absolutely measure it yourself to get a ballpark figure for your budget. Then, hire a professional to confirm the exact specifications before you sign any contracts or buy any materials.